Learning Horizon | For Learners

ASP.NET, SQL SERVER, JQUERY,JAVASCRIPT, WEBSPHERE

Monday, 3 August 2020

How To Check Lock Waits On IBM DB2 Database

Few days ago we received a complaint of slowness on one of our application so I have to check lock waits on IBM DB2. In this tutorial we will learn how to check lock waits on IBM DB2.

What are Lock Waits ?

Lock waits happen when a transaction or query wants to obtain a lock on resources such as database tables but that lock is already held by another query or transaction and if duration of these lock waits increase you will experience slowness in execution of query or transaction.

How to check Lock Waits ?

1. Login to your IBM DB2 database using database admin/owner login.

2. Type following command.

    db2top -d <database_name>

In my case the command was db2top -d P1DED where P1DEDB is the name of DB2 database.


db2-top-command

3. Type capital U by pressing shift key + u and you will see below screen.

check-lock-wait-screen


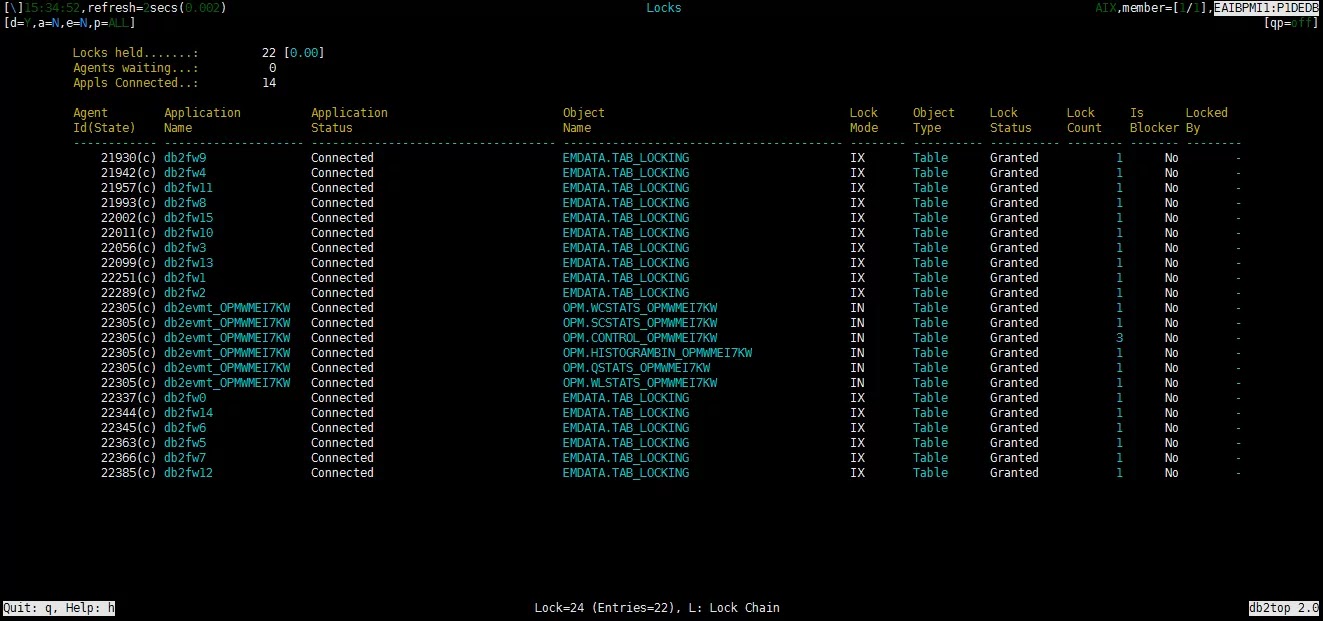
4. Type capital L by pressing shift key + l and you will see below screen. If there are some lock waits you will see them in next screen (as shown below in second screen shot.) and if there is nothing it means there are no lock waits(as shown in first screen shot) on your database and it is normal.

no-lock-waits

lock-waits

Hope this post will helpful for you. Please comment in the comment section below and share the post if you find this post informative and helpful. Thanks.

Sunday, 29 December 2019

Cannot Bind Multiple Parameters To Request Content | WebApi

I was working on one of my projects last week and stuck in a problem. I was trying to pass a class object and List of a class object to the Asp.Net Web API controller from my Jquery Ajax method (maybe you also encounter it while working with Angular and ASP.NET MVC or any other technology). After some research, I got to know that the Web API controller can’t accept multiple complex objects, so we must send it as a single object. Let me illustrate with my example and its resolution.

Jquery Code : -


  var SaleModel = new Object();  
       SaleModel.id = “1”;  // for example
       SaleModel.customer_id = $("#ddlCustomer").val(); 
   
  var SaleDetailModel = new Object();
    SaleDetailModel.id = “1”;
    SaleDetailModel.quantity = “10”;
  var lstSaleDetail = [];   // javascript array
    lstSaleDetail.push(SaleDetailModel);

 $.ajax({
      type: 'POST',
      data: 
      "{'obj': '"+JSON.stringify(SaleModel) + "',
      'lstSaleDetail':  '"+JSON.stringify(lstSaleDetail)+ "' }",
      headers: {
                 'Authorization': 'Bearer ' + authData.token
             },
      url: 'http://localhost:53807/api/sale/addsale',
      dataType: 'json',
      contentType: 'application/json',
      success: function (data) {
                if (data == true) {
                    alert("Sale Added Successfully!!!");
                }
            },
      error: function (xhr) {
                alert(xhr.responseText);
          }
  });

C# Code : -


       public class SaleModel
       {
          public int id {get;set;}
          public int customer_id {get;set;}
       }

       public class SaleDetailModel
       {
         public int id {get;set;}
         public int quantity {get;set;}
       }

       [HttpPost]
       public bool AddSale(SaleModel obj, List<SaleDetailModel> lstSaleDetail)
       {            
          SaleBusService objSale = new SaleBusService();
          return objSale.saveSale(obj, lstSaleDetail);           
       }

Solution : -

To fix the problem, we need to pass it as a single object that requires a modification in the above code. Below is the C# code. I have added the List Object of the SaleDetailModel class to the SaleModel Class as per my needs. You can create a new request class that contains both SaleModel and SaleDetailModel Objects.

C# Code :


public class SaleModel
{
   public int id {get;set;}
   public int customer_id {get;set;}
   // I have added the list here
   public List<SaleDetailModel> lstSaleDetail {get;set;} 
}

public class SaleDetailModel
{
   public int id {get;set;}
   public int quantity {get;set;}
}


[HttpPost]
public bool AddSale(SaleModel obj)
 {            
      SaleBusService objSale = new SaleBusService();
      return objSale.saveSale(obj, obj.lstSaleDetail);           
 }

Jquery Code :


var SaleModel = new Object();  
       SaleModel.id = “1”;  // for example
SaleModel.customer_id = $("#ddlCustomer").val(); 
   
var SaleDetailModel = new Object();
    SaleDetailModel.id = “1”;
    SaleDetailModel.quantity = “10”;
var lstSaleDetail = [];   // javascript array
lstSaleDetail.push(SaleDetailModel);

 $.ajax({
            type: 'POST',
     data: JSON.stringify(SaleModel) ,
            headers: {
                 'Authorization': 'Bearer ' + authData.token
             },
            url: 'http://localhost:53807/api/sale/addsale',
            dataType: 'json',
            contentType: 'application/json',
            success: function (data) {
                if (data == true) {
                    alert("Sale Added Successfully!!!");
                }
            },
            error: function (xhr) {
                alert(xhr.responseText);
            }
        });

Thursday, 24 October 2019

How To Install/Uninstall Apache Using Ansible PlayBook

Today we will learn how to install/uninstall Apache using ansible playbook on Linux or AIX machines. The most widely used web server in the world is the Apache HTTP server which provides pretty powerful features including extensive integration and media support as well. We’ve used RedHat Enterprise Linux 8 for our ansible control server and Red Hat Linux 6, AIX 7 machines for our target servers.

Ansible is an open-source automated tool that allows you to remotely configure systems across large server farms, install software, and perform complex tasks without manually log in to each server. In contrast to different other options, Ansible is installed on a single host, which can even be your local computer, and uses SSH to communicate with each remote host. This makes it very fast when configuring new servers because there is no need to install prerequisite software packages on each new server. It is very user-friendly because it uses a script in YAML format and uses a simple module-based syntax.

What is Ansible Playbook?

Playbooks are nothing but ansible configuration management scripts that can be used to manage the deployment and configuration of managed nodes. The playbook contains a set of policies or a set of steps in a regular IT process that you want your managed nodes to enforce. The ansible playbooks are written and developed in a simple text language known as YAML. A simple Ansible playbook contains one or multiple tasks.

Install Apache Using Ansible Playbook -- apache.yaml:

The below-mentioned playbook to install apache in Redhat Linux is written in YAML, and it contains multiple plays or tasks. Each task should have a name to display the current activity on the screen when running the script. This output is for human use, so it's great to describe each task step well.

With the help of this ansible-playbook, first of all, we will install the latest version of apache using the yum module, and then in the second step copy the demo HTML file to /var/www/html/ directory. After that, we will start the httpd service and enabled port 80 for traffic.

  • hosts: you can mention the IP address of the remote machine on which you want to install apache. In this case, I have used "all" and it means that we can run this playbook on all machines. Also this way I can filter the machine at the time executing the playbook. However, it is recommended to replace it with your IP address to avoid any problem at the end.
  • gather_facts: will gather information about remote machines first.
  • name: name of the play or task. It should be descriptive.
  • tags: tags are used to run a specific task or play from a whole playbook.
  • yum: yum is the module used you can use apt-get according to your choice. Like yum there are other modules used in this playbook e.g. copy, service, etc.

--- 
- 
  hosts: all
  gather_facts: true
  become: true
  tasks: 
    - 
      name: "1. Install Latest HTTPD/Apache"
      tags: install_apache
      yum: 
        name: httpd
        state: present
    - 
      name: "2. Copy dummy index.html file”
      tags: copy_index_file
      copy:
        src: /tmp/index.html
        dest: /var/www/html/index.html
        mode: '0664'
    - 
      name: "3. Start httpd service"
      tags: start_apache
      service: 
        enabled: true
        name: httpd
        state: started
    - 
      name: "4. Add apache ip table rule"
      tags: addport80_iptable
      # below is a one line command
      # due to space issue I break it
      # in two lines
      command: "iptables -A INPUT -m state 
      --state NEW -m tcp -p tcp --dport 80 -j ACCEPT"
    - 
      name: "5. Save iptable rule"
      tags: save_iptable
      command: iptables-save


How to Stop Apache using Ansible Playbook -- stopapache.yaml

This playbook contains only one play and when it runs it will stop the apache service.


--- 
- 
  hosts: all
  gather_facts: true
  become: true
  tasks: 
    - 
      name: "1. Stop httpd service"
      tags: stop_apache
      service: 
        name: httpd
        state: stopped


How to Restart Apache using Ansible Playbook -- restartapache.yaml

This playbook is used to restart the apache service.


--- 
- 
  hosts: all
  gather_facts: true
  become: true
  tasks: 
    - 
      name: "1. Restart httpd service"
      tags: restart_apache
      service: 
        name: httpd
        state: restarted


Uninstall Apache using Ansible Playbook -- uninstallapache.yaml:

In case you want to uninstall the apache service you can use the below script.


--- 
- 
  hosts: all
  gather_facts: true
  become: true
  tasks:
    - 
      name: "1. Uninstall HTTPD/Apache"
      tags: uninstall_apache
      yum:
        name: httpd
        autoremove: yes
        state: absent


How to run Ansible Playbook

  1. Open your shell terminal on the Ansible control server and go to /etc/ansible/ path.
  2. Check your playbook is syntactically correct or not.
  3. ansible-playbook apache.yaml -l appserver --check
  4. Check the list of possible tags in a specific playbook.
  5. ansible-playbook apache.yaml --list-tags
    ansible-tags
  6. Below is the command to run an ansible playbook on a specific host or a group of hosts. In this case, I am running it on appserver which is my group at the moment and contains two servers.
  7. ansible-playbook apache.yaml -l appserver -t install_apache

You are now able to create a simple playbook that will automate apache installation. Please check this post in case you want to manage users on a remote machine using ansible. Write in the comment section about your queries and concerns.

Wednesday, 23 October 2019

Create, Delete, Lock & Unlock Users In IBM AIX Using Ansible Playbook

Automation through ansible is gaining a lot of popularity among System Administratros because managing multiple server machines manually has become a very hectic task.Ansible comes with many handy modules out of which today we will look at ansible user module and try to learn about how to manage i.e. create or delete user, change password and lock or unlock user in IBM AIX 7.1 operating system machines using ansible playbook. Ansible playbook contains one or more tasks/plays each of which define the work to be done. All the task in ansible playbook are written in YAML (a strict typed language). We’ve used RedHat Enterprise Linux 8 (RHEL 8) VM’s (virtual machine) as our ansible control server and IBM AIX 7.1 machines for our target machines.

Ansible playbook document starts with 3 dashes(hyphens) at the most top of the document.
name specifies the name of the playbook. You can give any name to the playbook.
hosts specify the lists of hosts or host group against which plays or task will run. We can run tasks on multiple servers that’s why host group entry will come into play. hosts or host group are palced in /etc/ansible/hosts file
become specify that playbook will run as root user on target machines.
vars section let you define the variables which you can use later in your playbook.
tasks tasks/plays are list of actions that needs to be perform on target servers. Playbook contains one or multiple plays/tasks.


--- 
# ansible document starts with 3 dashes at the top
- 
  hosts: all
  become: true
# declaration of variables
  vars: 
    user_name: maxsteel
    user_pass: tevY2YxMOJk8U
    # password is Ptml@123
  tasks: 
    - 
      name: "Delete User"
      tags: delete_user
      user:
        name: "{{user_name}}"
        state: absent
        remove: yes
        force: yes
    - 
      name: "Create New User"
      tags: create_new_user
      user: 
        name: "{{user_name}}"
        password: "{{user_pass}}"
        update_password: on_create
    - 
      name: "Force Password Change on First Login"
      tags: force_change_password_first_login
      command: "pwdadm -f ADMCHG {{user_name}}"
    - 
      name: "Password Change"
      tags: password_update
      user: 
        name: "{{user_name}}"
        password: "{{user_pass}}"
        update_password: always
    - 
      name: "Lock User"
      tags: lock_user
      command: "chuser account_locked=true {{user_name}}"
    - 
      name: "Unlock User"
      tags: unlock_user
      command: "chuser account_locked=false {{user_name}}"

How to run Ansible playbook :-

  1. Open your shell terminal on ansible control server and go to /etc/ansible/ path.
  2. Check your playbook is syntactically correct or not.
  3. ansible-playbook manageuseraix.yaml -l webserver --check
  4. Check the list of possible tags in specific playbook.
  5. ansible-playbook manageuseraix.yaml --list-tags
  6. Below is the command to run ansible playbook on specific host or group of host.
  7. ansible-playbook manageuseraix.yaml -l webserver -t create_new_user -e “user_name=amir”

Monday, 23 September 2019

Install Ansible On Redhat Linux 7 System Offline

I have given a task in the team to automate some of the daily operational tasks so that we can increase productivity of the team and department. After some research on google I’ve found ansible. Today, we will learn about how to install ansible on redhat 7 Linux offline (without internet). This tutorial is for all of you folks who don’t have internet access on the target system. I’ve used Red Hat Enterprise Linux 7 (RHEL 7) VM (virtual machine) for this purpose.

What is Ansible?

Ansible is a free automation tool that supports the management of Unix-like and Microsoft Windows system configurations. It helps you use SSH to perform configuration management and deployment software on multiple nodes from one single machine. Also, we can execute the entire operation by a single ansible command. However, in some cases, it may be necessary to perform multiple commands for deployment.

Why We Should Use Ansible?

Because when you use other configuration management tools (such as puppet, chef, and CFEngine), the server software will be installed on one computer, and the client computer will be managed through an agent. In Ansible, nodes are managed by controlling computers via SSH (through Ansible control server), so no agent will run on the node computers. We can use a significant number of ready-made modules for configuration management. Because it's an open-source IT automation tool so, we can write custom modules as well.

OS Support:

Currently, We can run ansible from any machine with Python 2 (version 2.7) or Python 3 (versions 3.5 and higher) installed. It includes Red Hat Linux, Debian, CentOS or Fedora, OS X, Ubuntu, Solaris Arch Linux, Slackware Linux, Clear Linux any of the BSDs. Microsoft Windows is not supported for the control node.

Pre-Requisites to Install Ansible On RHEL 7:

  1. Before installing ansible you should ensure underneath referenced essentials are available on your target system. If not present, you should download beneath RPM’s and make them accessible by replicating on the objective machine in suitable catalog/directory for example installation_media.

I will recommend you install the above RPM’s using yum localinstall command instead of any other rpm command because yum can easily handle any prerequisites needed by these packages.

Pre-Requisite Installation Commands:

yum localinstall -y /installation_media/python-crypto2.6-2.6.1-2.el6.x86_64.rpm
yum localinstall -y /installation_media/python-httplib2-0.7.41.el6.art.noarch.rpm
yum localinstall -y /installation_media/python-jinja2-26-2.6-3.el6.noarch.rpm
yum localinstall -y /installation_media/python-keyczar-0.71c 1.el6.noarch.rpm
yum localinstall -y /installation_media/sshpass-1.05-5.el6.art.x86_64.rpm

Ansible Installation Procedure:

  1. Download Ansible from this URL (https://www.rpmfind.net/linux/rpm2html/search.php?query=ansible ) and copy this rpm to the installation_media catalog/directory on target machine.
  2. Use mentioned command to install ansible. i.e. Yum localinstall /installation_media/ansible*
  3. When above command completed, you can verify that ansible is installed successfully by using command i.e. ansible --version
ansible-version

Ansible Hierarchy:

It's time to explain the ansible file/folder hierarchy. You will notice that if you list files or folders in /etc/ansible, you will see the following. In addition, I have provided a description of each file or folder.

  • /etc/ansible — The ansible home folder where everything resides
  • /etc/ansible/hosts — This file contains information of hosts. You can mention host name their IP's or mention them in the form of groups.
  • /etc/ansible/ansible.cfg — This is the main configuration file for Ansible
  • /etc/ansible/roles — This folder allows you to create folders for each server role, web/db/app, etc.

A rich documentation availability and regular updates of Ansible on it's website makes it a very strong competitor of Puppet and Chef like automation tools. Please write us in the comment section if you have any queries or question regarding this post. In the next article I will talk about how to create or delete user by using ansible playbook.