Learning Horizon | For Learners

ASP.NET, SQL SERVER, JQUERY,JAVASCRIPT, WEBSPHERE

Showing posts with label Linux Administration. Show all posts

Thursday, 24 October 2019

How To Install/Uninstall Apache Using Ansible PlayBook

Today we will learn how to install/uninstall Apache using ansible playbook on Linux or AIX machines. The most widely used web server in the world is the Apache HTTP server which provides pretty powerful features including extensive integration and media support as well. We’ve used RedHat Enterprise Linux 8 for our ansible control server and Red Hat Linux 6, AIX 7 machines for our target servers.

Ansible is an open-source automated tool that allows you to remotely configure systems across large server farms, install software, and perform complex tasks without manually log in to each server. In contrast to different other options, Ansible is installed on a single host, which can even be your local computer, and uses SSH to communicate with each remote host. This makes it very fast when configuring new servers because there is no need to install prerequisite software packages on each new server. It is very user-friendly because it uses a script in YAML format and uses a simple module-based syntax.

What is Ansible Playbook?

Playbooks are nothing but ansible configuration management scripts that can be used to manage the deployment and configuration of managed nodes. The playbook contains a set of policies or a set of steps in a regular IT process that you want your managed nodes to enforce. The ansible playbooks are written and developed in a simple text language known as YAML. A simple Ansible playbook contains one or multiple tasks.

Install Apache Using Ansible Playbook -- apache.yaml:

The below-mentioned playbook to install apache in Redhat Linux is written in YAML, and it contains multiple plays or tasks. Each task should have a name to display the current activity on the screen when running the script. This output is for human use, so it's great to describe each task step well.

With the help of this ansible-playbook, first of all, we will install the latest version of apache using the yum module, and then in the second step copy the demo HTML file to /var/www/html/ directory. After that, we will start the httpd service and enabled port 80 for traffic.

  • hosts: you can mention the IP address of the remote machine on which you want to install apache. In this case, I have used "all" and it means that we can run this playbook on all machines. Also this way I can filter the machine at the time executing the playbook. However, it is recommended to replace it with your IP address to avoid any problem at the end.
  • gather_facts: will gather information about remote machines first.
  • name: name of the play or task. It should be descriptive.
  • tags: tags are used to run a specific task or play from a whole playbook.
  • yum: yum is the module used you can use apt-get according to your choice. Like yum there are other modules used in this playbook e.g. copy, service, etc.

--- 
- 
  hosts: all
  gather_facts: true
  become: true
  tasks: 
    - 
      name: "1. Install Latest HTTPD/Apache"
      tags: install_apache
      yum: 
        name: httpd
        state: present
    - 
      name: "2. Copy dummy index.html file”
      tags: copy_index_file
      copy:
        src: /tmp/index.html
        dest: /var/www/html/index.html
        mode: '0664'
    - 
      name: "3. Start httpd service"
      tags: start_apache
      service: 
        enabled: true
        name: httpd
        state: started
    - 
      name: "4. Add apache ip table rule"
      tags: addport80_iptable
      # below is a one line command
      # due to space issue I break it
      # in two lines
      command: "iptables -A INPUT -m state 
      --state NEW -m tcp -p tcp --dport 80 -j ACCEPT"
    - 
      name: "5. Save iptable rule"
      tags: save_iptable
      command: iptables-save


How to Stop Apache using Ansible Playbook -- stopapache.yaml

This playbook contains only one play and when it runs it will stop the apache service.


--- 
- 
  hosts: all
  gather_facts: true
  become: true
  tasks: 
    - 
      name: "1. Stop httpd service"
      tags: stop_apache
      service: 
        name: httpd
        state: stopped


How to Restart Apache using Ansible Playbook -- restartapache.yaml

This playbook is used to restart the apache service.


--- 
- 
  hosts: all
  gather_facts: true
  become: true
  tasks: 
    - 
      name: "1. Restart httpd service"
      tags: restart_apache
      service: 
        name: httpd
        state: restarted


Uninstall Apache using Ansible Playbook -- uninstallapache.yaml:

In case you want to uninstall the apache service you can use the below script.


--- 
- 
  hosts: all
  gather_facts: true
  become: true
  tasks:
    - 
      name: "1. Uninstall HTTPD/Apache"
      tags: uninstall_apache
      yum:
        name: httpd
        autoremove: yes
        state: absent


How to run Ansible Playbook

  1. Open your shell terminal on the Ansible control server and go to /etc/ansible/ path.
  2. Check your playbook is syntactically correct or not.
  3. ansible-playbook apache.yaml -l appserver --check
  4. Check the list of possible tags in a specific playbook.
  5. ansible-playbook apache.yaml --list-tags
    ansible-tags
  6. Below is the command to run an ansible playbook on a specific host or a group of hosts. In this case, I am running it on appserver which is my group at the moment and contains two servers.
  7. ansible-playbook apache.yaml -l appserver -t install_apache

You are now able to create a simple playbook that will automate apache installation. Please check this post in case you want to manage users on a remote machine using ansible. Write in the comment section about your queries and concerns.


Monday, 23 September 2019

Install Ansible On Redhat Linux 7 System Offline

I have given a task in the team to automate some of the daily operational tasks so that we can increase productivity of the team and department. After some research on google I’ve found ansible. Today, we will learn about how to install ansible on redhat 7 Linux offline (without internet). This tutorial is for all of you folks who don’t have internet access on the target system. I’ve used Red Hat Enterprise Linux 7 (RHEL 7) VM (virtual machine) for this purpose.

What is Ansible?

Ansible is a free automation tool that supports the management of Unix-like and Microsoft Windows system configurations. It helps you use SSH to perform configuration management and deployment software on multiple nodes from one single machine. Also, we can execute the entire operation by a single ansible command. However, in some cases, it may be necessary to perform multiple commands for deployment.

Why We Should Use Ansible?

Because when you use other configuration management tools (such as puppet, chef, and CFEngine), the server software will be installed on one computer, and the client computer will be managed through an agent. In Ansible, nodes are managed by controlling computers via SSH (through Ansible control server), so no agent will run on the node computers. We can use a significant number of ready-made modules for configuration management. Because it's an open-source IT automation tool so, we can write custom modules as well.

OS Support:

Currently, We can run ansible from any machine with Python 2 (version 2.7) or Python 3 (versions 3.5 and higher) installed. It includes Red Hat Linux, Debian, CentOS or Fedora, OS X, Ubuntu, Solaris Arch Linux, Slackware Linux, Clear Linux any of the BSDs. Microsoft Windows is not supported for the control node.

Pre-Requisites to Install Ansible On RHEL 7:

  1. Before installing ansible you should ensure underneath referenced essentials are available on your target system. If not present, you should download beneath RPM’s and make them accessible by replicating on the objective machine in suitable catalog/directory for example installation_media.

I will recommend you install the above RPM’s using yum localinstall command instead of any other rpm command because yum can easily handle any prerequisites needed by these packages.

Pre-Requisite Installation Commands:

yum localinstall -y /installation_media/python-crypto2.6-2.6.1-2.el6.x86_64.rpm
yum localinstall -y /installation_media/python-httplib2-0.7.41.el6.art.noarch.rpm
yum localinstall -y /installation_media/python-jinja2-26-2.6-3.el6.noarch.rpm
yum localinstall -y /installation_media/python-keyczar-0.71c 1.el6.noarch.rpm
yum localinstall -y /installation_media/sshpass-1.05-5.el6.art.x86_64.rpm

Ansible Installation Procedure:

  1. Download Ansible from this URL (https://www.rpmfind.net/linux/rpm2html/search.php?query=ansible ) and copy this rpm to the installation_media catalog/directory on target machine.
  2. Use mentioned command to install ansible. i.e. Yum localinstall /installation_media/ansible*
  3. When above command completed, you can verify that ansible is installed successfully by using command i.e. ansible --version
ansible-version

Ansible Hierarchy:

It's time to explain the ansible file/folder hierarchy. You will notice that if you list files or folders in /etc/ansible, you will see the following. In addition, I have provided a description of each file or folder.

  • /etc/ansible — The ansible home folder where everything resides
  • /etc/ansible/hosts — This file contains information of hosts. You can mention host name their IP's or mention them in the form of groups.
  • /etc/ansible/ansible.cfg — This is the main configuration file for Ansible
  • /etc/ansible/roles — This folder allows you to create folders for each server role, web/db/app, etc.

A rich documentation availability and regular updates of Ansible on it's website makes it a very strong competitor of Puppet and Chef like automation tools. Please write us in the comment section if you have any queries or question regarding this post. In the next article I will talk about how to create or delete user by using ansible playbook.

Thursday, 25 April 2019

How To Install Apache Tomcat On Linux System Offline

In this tutorial we will learn about how to install Apache Tomcat on Linux machine without internet. In many organizations internet access to system is not allowed due to security purposes or it requires approval from your management to get internet access which is time consuming. So, this tutorial is for all of you folks who don’t want to pass above hectic process. In my case I have windows machine (also called a host machine) on which I’ve made a RedHat Enterprise Linux 7 virtual machine (also called a guest machine) for practical purpose and going to install Apache Tomcat.

Pre-Requisite: -

  1. Make sure you have Java SE 7 or 8 installed on your Linux machine because it is mandatory for Apache Tomcat. To check if you already have JAVA installed on your Linux machine please use below command.
    java -version

    If you don’t have JAVA installed on Linux machine, please see my post on this topic.

Procedure: -

  1. Go to Apache Tomcat official download page and download tar.gz file. If you have internet allowed on your Linux machine, then use wget command to download it directly on Linux machine.

    apache-tomcat-official-page
  2. After downloading the above package, you can use FileZilla or WinSCP or Xftp to upload the package on Linux machine. Since I am using Xshell so there is a built-in Xftp for file uploading. I’ve uploaded the file on /home directory.

    home-directory-path
  3. Type below mentioned command on terminal to extract tomcat folder from tar.gz file.
    tar xzf i.e. tar xzf apache-tomcat-7.0.94

  4. Move the extracted tomcat folder to /usr/local/ directory with the help of below command.
    mv apache-tomcat-7.0.94 /usr/local/tomcat

  5. Now it’s time to start the Tomcat server. So Just go to /usr/local/tomcat/bin/ directory and use below command.
    cd /usr/local/tomcat/bin/
    ./startup.sh

  6. To access Tomcat, open your browser and type below link. By default, 8080 is the port for Apache Tomcat server.
    http://localhost:8080 or http://computer_name:8080 or http://computer_ip :8080

    tomcat-default-page
  7. In the end we need to create user (modify this file /usr/local/tomcat/conf/tomcat-users.xml) to secure and access manager pages. In my case I have created only a “tomcat” user with role “manager-gui” who can only access manager section. You can create user with multiple role as well.

    tomcat-user
  8. To stop Tomcat server, you can use below command.
    cd /usr/local/tomcat/bin
    ./shutdown.sh

Tuesday, 23 April 2019

How To Install Apache Server On Red Hat Linux System Offline

Today, we will learn about how to install Apache server on Red Hat Linux machine without internet. In many organizations internet access to system is not allowed due to security purposes or it requires approval from your management to get internet access which is time consuming. So, this tutorial is for all of you folks who don’t want to bear that hassle. I’ve used Red Hat Enterprise Linux 7 vm (virtual machine) for this purpose.

Pre-Requisite:

  1. Make sure you have already mounted Linux .ISO file and setup your local yum repository. If you don’t know the procedure or not yet setup the yum repository then please read my previous post on this topic.

Procedure:

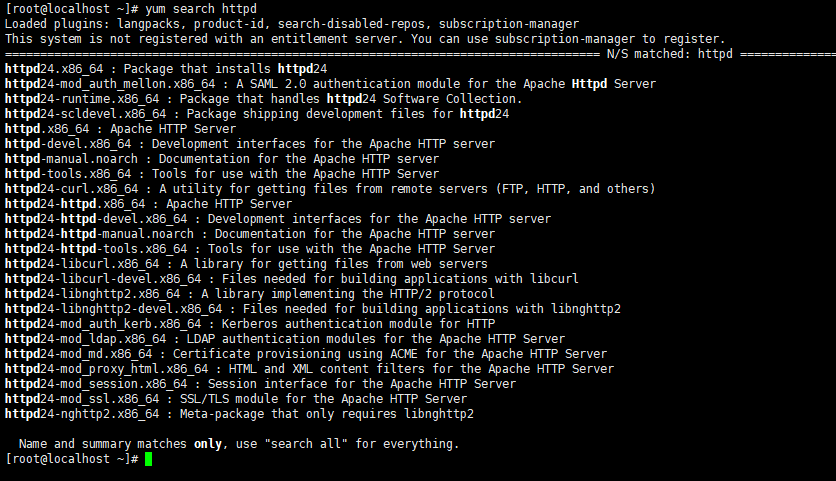
  1. Open the terminal on Linux machine and type below command to search Apache web server package on yum repository. Mentioned below are the result of this command. Apache2.4 is the latest version of Apache web server at the time of writing this post.
    yum search httpd

    install-apache-redhat-linux
  2. Use below mentioned command to install apache on your Linux machine.
    yum install <package name> i.e. Yum install httpd24.x86_64

  3. If you don’t know about each package from above list mentioned in screen shot just simply type below command. It will install everything starts with httpd.
    Yum install httpd*

  4. To verify if apache is installed or not please use below command. If this command doesn’t return any result it means apache is not installed on this machine.
    rpm -qa | grep httpd

  5. Finally, you need to start apache server by using below mentioned command.
    service httpd start

Sunday, 21 April 2019

Install Self-Signed Certificate In Apache Server On Linux

In this tutorial today, we will learn about how to install self-signed certificate in Apache server on Linux machine. First, before starting the activity you need to make sure that all below mentioned pre-requisites are already installed on Linux system. I’ve used RedHat Enterprise Linux 7 vm (virtual machine) for this purpose.

Pre-Requisites: -

  1. Make sure mod_ssl is installed

    If above packages are not installed on your system already, please install them before further proceedings with the help of below command.
    yum install mod_ssl

    To check mod_ssl is installed or not please use below command
    rpm -qa | grep -i mod_ssl

  2. Make sure that port 443 is open. By default, it is closed so you need use below mentioned command to open this port.
    firewall-cmd --zone=public --add-port=443/tcp –permanent

  3. Make sure that you have loaded the mod_ssl module in httpd.conf file
    LoadModule ssl_module modules/mod_ssl.so

Procedure: -


Below are the steps to install self-signed certificate.
  1. Go to the following path.
    cd /etc/httpd/conf.d

  2. Type ls command on your terminal and you will see a ssl.conf file in which you need to make some modifications.

  3. Open this (ssl.conf) file in your terminal with the help of vi command.
    vi ssl.conf

  4. Search/Locate <VirtuaHost_default_:443> and add/set below values. <VirtualHost _default_:443>
    ServerAdmin admin@demosite.com
    ServerName www.demosite.com
    SSLEngine on
    SSLCertificateFile /etc/pki/tls/certs/demosite.com.crt
    SSLCertificateKeyFile /etc/pki/tls/certs/demosite.com.key
    </VirtualHost>

    After saving all modifications restart Apache server by using service httpd restart command.

Friday, 19 April 2019

Create Self Signed Certificate In Apache Server On Linux

In this tutorial today, we are going to learn about how we can create self-signed certificate in Apache server on Linux machine. First, before starting the activity you need to make sure that all below mentioned pre-requisites are already installed on Linux system. I’ve used RedHat Enterprise Linux 7 vm (virtual machine) for this purpose.

Pre-Requisites: -

  1. Make sure openssl package is installed (It is important for creating the certificate)
  2. Make sure mod_ssl is installed (It is important for running your website on https so after creating certificate you need to install that certificate on system so it’s better to install it early.)
If above packages are not installed on your system already, please install them before further proceedings with the help of below command.
yum install mod_ssl openssl

Procedure: -


Below are the steps to create certificate.
  1. Go to the following path.

    cd /etc/pki/tls/certs

  2. If this path doesn’t exist or directory not created at this path, please create with the help of following command.

    mkdir -p /etc/pki/tls/certs

  3. Finally, to create the self-signed certificate use below mentioned command.

    openssl req -x509 -nodes -newkey rsa:2048 -keyout demosite.com.key -out demosite.com.crt

    After giving this command on terminal system will ask a series of questions (like mentioned below) for which you need to set/input the value.

    Country Name (2 letter code) [XX]: PK
    State or Province Name (full name) []: Islamabad
    Locality Name (e.g., city) [Default City]: Islamabad
    Organization Name (e.g., company) [Default Company Ltd]: DemoCompany
    Organizational Unit Name (e.g., section) []: DemoWebsite
    Common Name (e.g., your name or your server's hostname) []: www.demosite.com
    Email Address []: admin@demosite.com

    After completion system will create 1 key file i.e. demosite.com.key and 1 certificate file i.e. demosite.com.crt in this path i.e. /etc/pki/tls/certs
    You can create self-signed certificate for IP as well as domain i.e. instead of demosite.com you can mention the IP address of the system.

Thursday, 18 April 2019

How To Mount Linux ISO File | Setup Yum Repository

Today in this tutorial we will learn about how to mount the Redhat Linux .ISO file to a directory and setup a Yum repository so that we can install Apache and other software packages from repository. I’ve setup a local VM for this purpose and below are the steps that you can follow to reach home safely.
  1. First copy your redhat .ISO media file to your Linux desktop or home directory. Since I am using Xshell so I use built-in Xftp to copy .ISO file on my home directory of VM.

  2. Mount this .ISO installation media file to some folder/directory using below command. In my case I’ve mounted it to /mnt directory.
    mount -o loop /home/rhel-server-7.6-x86_64-dvd.iso /mnt
    or
    mount /home/rhel-server-7.6-x86_64-dvd.iso /mnt

  3. Copy media.repo file from/mnt directory to /etc/ and then yum.repos.d/ directory using below command. In my case I’ve renamed this file to rhel7.repo while copying it. You can choose whatever name just make sure that its extension would be (.repo).
    cp /mnt/media.repo /etc/yum.repos.d/rhel7.repo

  4. Give permissions to this rhel7.repo file using below command.
    chmod 644 /etc/yum.repos.d/rhel7.repo
  5. Now modify this repo file. Add mentioned below lines at the end of this file.
    enabled=1
    baseurl=file:///mnt/
    gpgkey=file:///etc/pki/rpm-gpg/RPM-GPG-KEY-redhat-release
  6. Also change gpgcheck parameter value from 0 to 1 and save it using :wq! command. Your file will look like this

  7. Clean the cache using below command.
    yum clean all
  8. To verify use below command
    yum repolist