Learning Horizon | For Learners

ASP.NET, SQL SERVER, JQUERY,JAVASCRIPT, WEBSPHERE

Monday, 2 September 2019

How To Install IBM WAS ND Version 8.5.5.0 On Windows

Today, we will learn about how to install IBM WebSphere Application Server Network Deployment on windows.

Pre-Requisite:

  1. First, you should have IBM Installation Manager installed. You can see my previous post on how to install IBM Installation Manager.
  2. Secondly, according to your operating system, the WAS ND version 8.5.5.0 installer of IBM WebSphere Application Server is required. You can download this installer from the IBM website.
Below are the steps to install IBM WebSphere Application Server Network Deployment Version 8.5.5.0 on windows.

Procedure:

  1. Now that you have downloaded the installer file (i.e., zip file). Extract this file to any location of your choice. In my case, I have extracted it on desktop, namely C:\Users\Administrator\Desktop\Installation_Software\WASND_v8.5.5. Now open this folder and you will see the repository.config file. See the figure below.


    was-nd-installer-path

  2. Open IBM Installation Manager from the start menu and click on the File from upper left menu and then preferences.


    set-prefrence


  3. Click on the add repository button from the right side of the new popup window and browse for a path to the repository.config file, select it, and then press OK two times to set the location.


    set-repository height=

  4. After setting the path, click the Install icon from IBM Installation Manager.
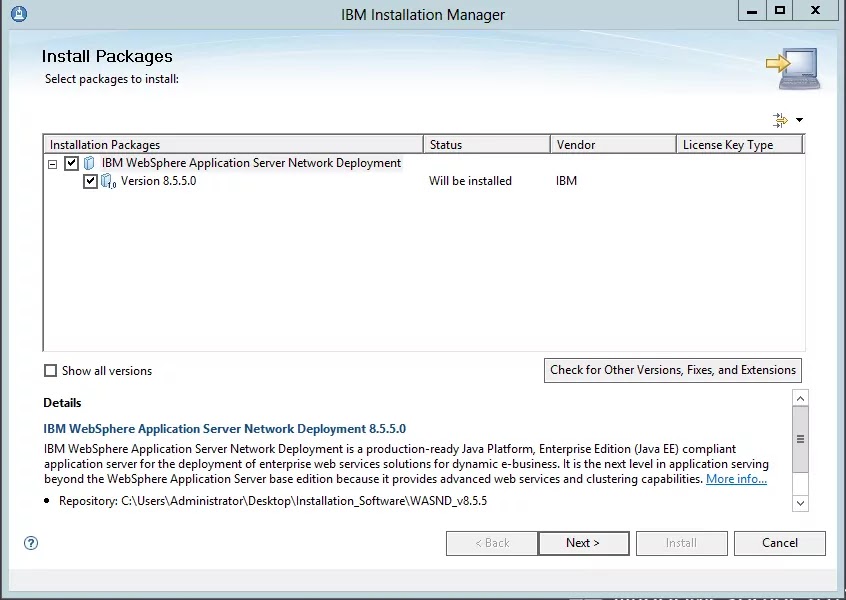
  5. Select the installation package and WAS version 8.5.5.0 and click on Next.
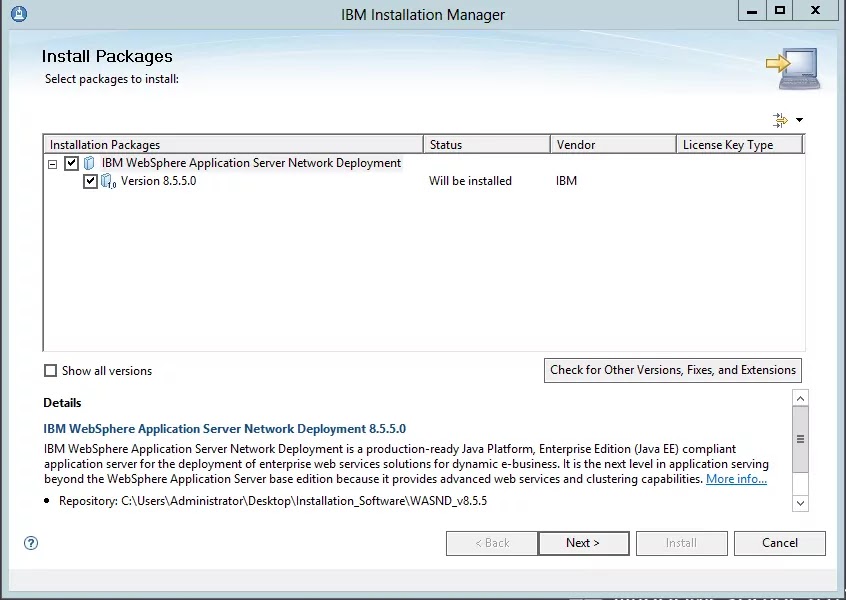

    select-was-version

  6. From the next window, accept the license agreement and click on Next.
  7. Select the shared resource directory and then click Next. A screen will appear to show package group name and available space details so leave as it is and click on Next.
  8. Select the language and then click Next.
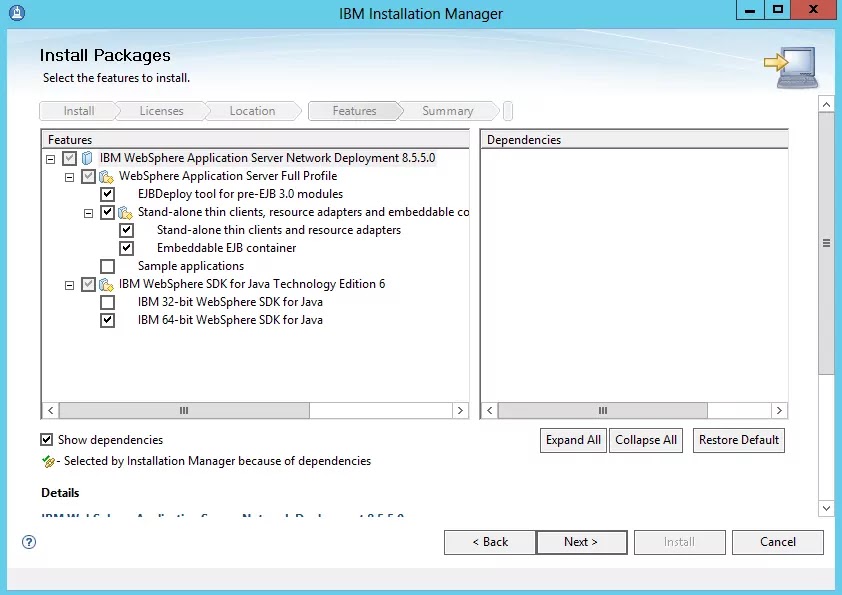
  9. Select the appropriate Java SDK details from this window and click Next.
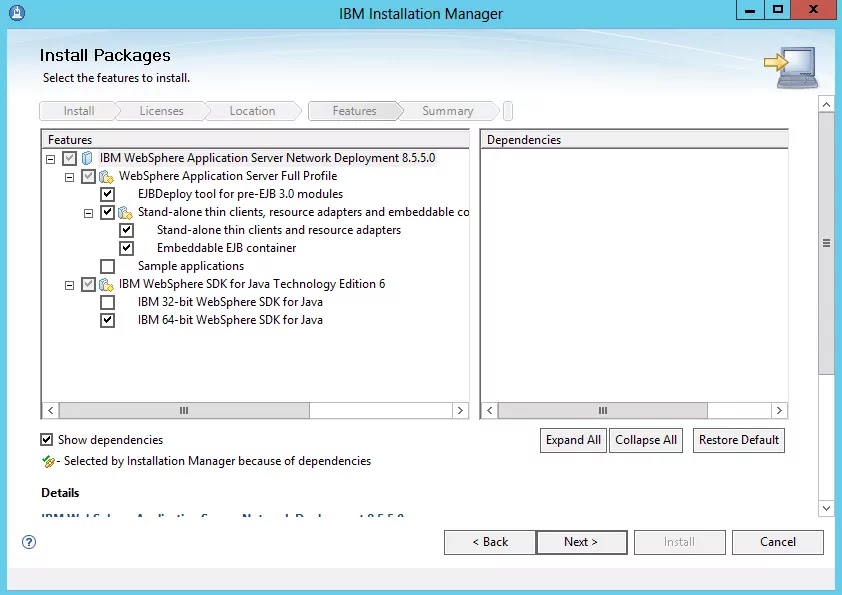

    select-java-features


  10. Click on the Install button and wait for a complete installation. When installation finished select on “None” radio button from the right side and then the Finish button.


  11. finish-was-install

Thursday, 29 August 2019

How To Install IBM Installation Manager On Windows

Today, we will learn about how to install IBM Installation Manager on windows. IBM Installation Manager is used to install WebSphere Application Server (WAS) as well as other programs.

Pre-Requisite:

  1. You need 64-bit installer of IBM Installation manager depending on your operating system. You can download this installer from IBM website. i.e. https://www-01.ibm.com/support/docview.wss?uid=swg27025142
Below are the steps to install IBM Installation Manager on windows.

Procedure:

  1. Double click on install icon in the installer folder and it will start/open IBM installation manager initial screen.

    installation-manager-installer
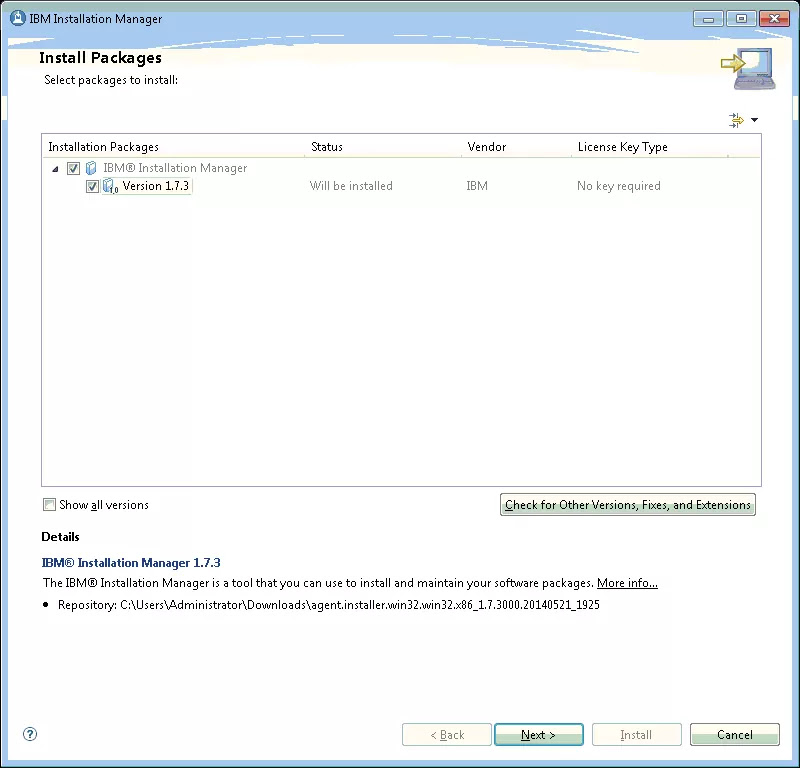
  2. Select package to install on windows. i.e. in my case it’s version is 1.7.3 and click Next.

    installation-manager-version-selection


  3. From next screen accept the license agreement and click Next.
  4. Select appropriate path for installation of IBM Installation manager and click Next.

    installation-manager-path


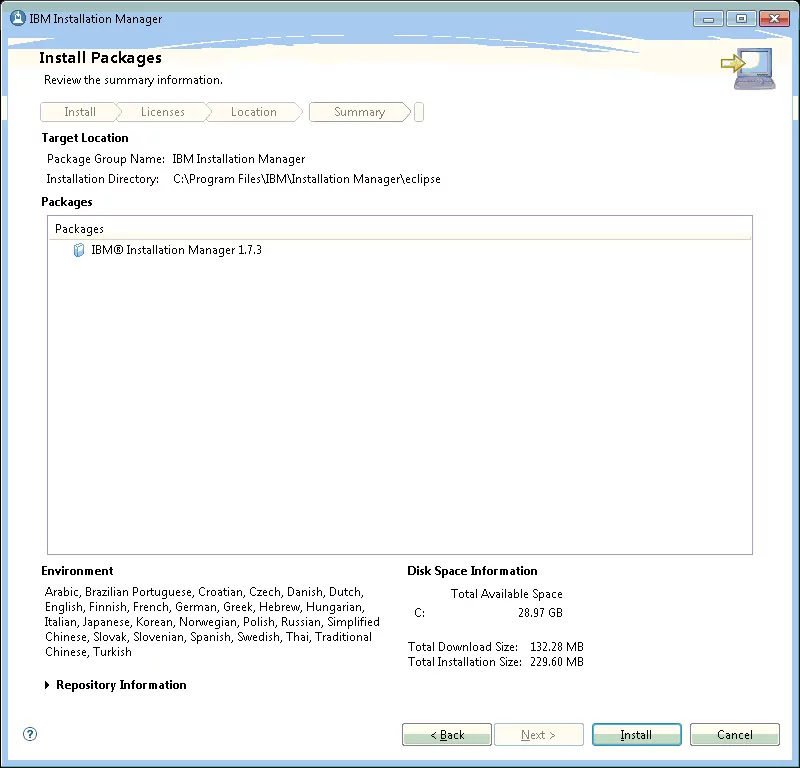
  5. From the next window click on install button. Installation will start, and it will take some time to complete.

    install-window


  6. After completion of installation you can open and run installation manager. To open installation manager you can go to start menu in windows and type installation manager as well.

    installation-manager-complete-screen

Thursday, 25 April 2019

How To Install Apache Tomcat On Linux System Offline

In this tutorial we will learn about how to install Apache Tomcat on Linux machine without internet. In many organizations internet access to system is not allowed due to security purposes or it requires approval from your management to get internet access which is time consuming. So, this tutorial is for all of you folks who don’t want to pass above hectic process. In my case I have windows machine (also called a host machine) on which I’ve made a RedHat Enterprise Linux 7 virtual machine (also called a guest machine) for practical purpose and going to install Apache Tomcat.

Pre-Requisite: -

  1. Make sure you have Java SE 7 or 8 installed on your Linux machine because it is mandatory for Apache Tomcat. To check if you already have JAVA installed on your Linux machine please use below command.
    java -version

    If you don’t have JAVA installed on Linux machine, please see my post on this topic.

Procedure: -

  1. Go to Apache Tomcat official download page and download tar.gz file. If you have internet allowed on your Linux machine, then use wget command to download it directly on Linux machine.

    apache-tomcat-official-page
  2. After downloading the above package, you can use FileZilla or WinSCP or Xftp to upload the package on Linux machine. Since I am using Xshell so there is a built-in Xftp for file uploading. I’ve uploaded the file on /home directory.

    home-directory-path
  3. Type below mentioned command on terminal to extract tomcat folder from tar.gz file.
    tar xzf i.e. tar xzf apache-tomcat-7.0.94

  4. Move the extracted tomcat folder to /usr/local/ directory with the help of below command.
    mv apache-tomcat-7.0.94 /usr/local/tomcat

  5. Now it’s time to start the Tomcat server. So Just go to /usr/local/tomcat/bin/ directory and use below command.
    cd /usr/local/tomcat/bin/
    ./startup.sh

  6. To access Tomcat, open your browser and type below link. By default, 8080 is the port for Apache Tomcat server.
    http://localhost:8080 or http://computer_name:8080 or http://computer_ip :8080

    tomcat-default-page
  7. In the end we need to create user (modify this file /usr/local/tomcat/conf/tomcat-users.xml) to secure and access manager pages. In my case I have created only a “tomcat” user with role “manager-gui” who can only access manager section. You can create user with multiple role as well.

    tomcat-user
  8. To stop Tomcat server, you can use below command.
    cd /usr/local/tomcat/bin
    ./shutdown.sh

Tuesday, 23 April 2019

How To Install Apache Server On Red Hat Linux System Offline

Today, we will learn about how to install Apache server on Red Hat Linux machine without internet. In many organizations internet access to system is not allowed due to security purposes or it requires approval from your management to get internet access which is time consuming. So, this tutorial is for all of you folks who don’t want to bear that hassle. I’ve used Red Hat Enterprise Linux 7 vm (virtual machine) for this purpose.

Pre-Requisite:

  1. Make sure you have already mounted Linux .ISO file and setup your local yum repository. If you don’t know the procedure or not yet setup the yum repository then please read my previous post on this topic.

Procedure:

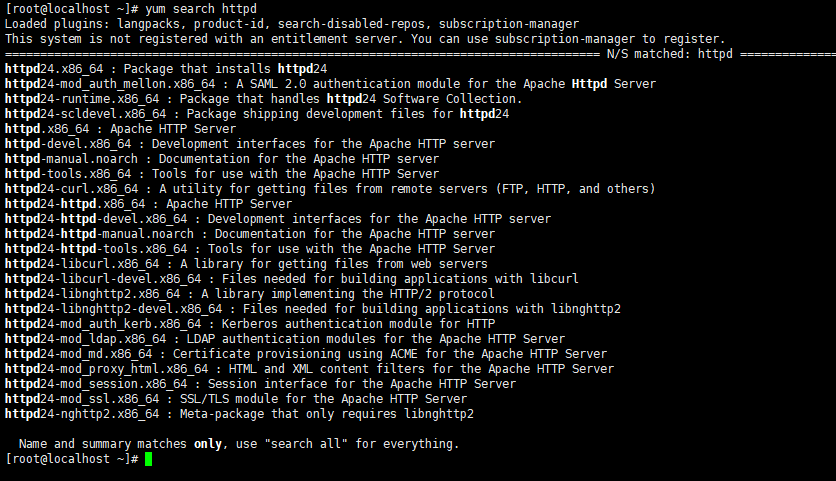
  1. Open the terminal on Linux machine and type below command to search Apache web server package on yum repository. Mentioned below are the result of this command. Apache2.4 is the latest version of Apache web server at the time of writing this post.
    yum search httpd

    install-apache-redhat-linux
  2. Use below mentioned command to install apache on your Linux machine.
    yum install <package name> i.e. Yum install httpd24.x86_64

  3. If you don’t know about each package from above list mentioned in screen shot just simply type below command. It will install everything starts with httpd.
    Yum install httpd*

  4. To verify if apache is installed or not please use below command. If this command doesn’t return any result it means apache is not installed on this machine.
    rpm -qa | grep httpd

  5. Finally, you need to start apache server by using below mentioned command.
    service httpd start

Sunday, 21 April 2019

Install Self-Signed Certificate In Apache Server On Linux

In this tutorial today, we will learn about how to install self-signed certificate in Apache server on Linux machine. First, before starting the activity you need to make sure that all below mentioned pre-requisites are already installed on Linux system. I’ve used RedHat Enterprise Linux 7 vm (virtual machine) for this purpose.

Pre-Requisites: -

  1. Make sure mod_ssl is installed

    If above packages are not installed on your system already, please install them before further proceedings with the help of below command.
    yum install mod_ssl

    To check mod_ssl is installed or not please use below command
    rpm -qa | grep -i mod_ssl

  2. Make sure that port 443 is open. By default, it is closed so you need use below mentioned command to open this port.
    firewall-cmd --zone=public --add-port=443/tcp –permanent

  3. Make sure that you have loaded the mod_ssl module in httpd.conf file
    LoadModule ssl_module modules/mod_ssl.so

Procedure: -


Below are the steps to install self-signed certificate.
  1. Go to the following path.
    cd /etc/httpd/conf.d

  2. Type ls command on your terminal and you will see a ssl.conf file in which you need to make some modifications.

  3. Open this (ssl.conf) file in your terminal with the help of vi command.
    vi ssl.conf

  4. Search/Locate <VirtuaHost_default_:443> and add/set below values. <VirtualHost _default_:443>
    ServerAdmin admin@demosite.com
    ServerName www.demosite.com
    SSLEngine on
    SSLCertificateFile /etc/pki/tls/certs/demosite.com.crt
    SSLCertificateKeyFile /etc/pki/tls/certs/demosite.com.key
    </VirtualHost>

    After saving all modifications restart Apache server by using service httpd restart command.